Here's the problem: magnetic tape typically holds up for only 10 to 30 years before playback quality starts to noticeably decline, according to Canada's Conservation Institute. Film isn't immune either. Old acetate stock can develop "vinegar syndrome," causing shrinkage, curling, and brittleness that no amount of careful handling can reverse.
This guide walks through the full digitizing process: what equipment you need, how to capture footage without wrecking fragile tapes, when a DIY approach makes sense versus calling in a professional, and the mistakes that ruin more home movies than the tapes themselves ever could.
Key Takeaways
- Tapes and film degrade continuously: waiting won't improve your transfer odds.
- DIY suits small, healthy collections; professionals handle volume, damage, and obsolete formats.
- Playback equipment and tape condition affect quality more than your chosen method.
- Digitized files still need backups: one copy is one failure away from gone.
- Costs vary by format, volume, and condition — see the FAQ for specifics.
How to Digitize Old Home Movies: Step-by-Step Guide
Step 1: Inventory and Prepare Your Tapes or Film
Start by sorting everything by format. VHS, VHS-C, Hi8, Digital8, MiniDV, and film gauges like 8mm, Super 8, and 16mm each require different playback equipment, so you can't mix and match decks.
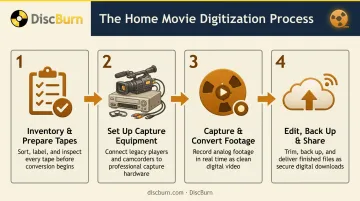
Don't test unknown tapes on an old, unused VCR or camcorder just to see if they still play. Rubber belts and pinch rollers dry out over years of storage. A brittle roller can shred a tape in seconds, and there's no undo button once that happens.
Before playing anything, restore tape tension:
- Fast-forward the tape all the way to the end
- Rewind it completely back to the start
- Let it settle for a few minutes before inserting it into a player
This simple step realigns tape that's been sitting wound tight for years and noticeably reduces flutter and dropouts during capture.
Step 2: Set Up the Right Capture Equipment
For VHS and similar tape formats, you'll need a working VCR or camcorder connected to a computer through a video capture card or USB converter, using RCA or HDMI cables depending on your gear. This setup pulls the analog signal off the tape and turns it into a digital file in real time.
Free and low-cost software options that handle this well:
- OBS: Records and captures live video signals
- VirtualDub: A lightweight Windows-based capture and editing tool
- HandBrake: Doesn't capture, but transcodes existing files into other formats afterward
Film is a different animal entirely. Pointing a camera at a projector screen loses far too much detail and introduces flicker. Film reels need a dedicated film scanner that captures each frame individually, which is why most people send 8mm, Super 8, and 16mm reels to a specialist rather than attempting it at home.
Step 3: Capture and Convert the Footage
Play the tape from start to finish while recording, and actually watch the screen. Dropouts, tracking lines, or sudden glitches often show up mid-capture, and catching them early means you can stop, clean the heads, or try a different deck before wasting the whole tape.
Keep the aspect ratio at 4:3, matching the original recording. Stretching old footage to fill a modern 16:9 screen distorts faces and proportions, according to the Library of Congress's format guidance for moving image preservation.
Save your working file in a widely supported format like MP4 or MOV. Neither format is automatically "archival" on its own. That depends on the codec and bitrate you choose, not just the file extension.
Step 4: Edit, Back Up, and Share the Final Files
Once footage is captured, basic cleanup makes it watchable:
- Trim dead air and blank sections at the start and end
- Adjust audio levels if the original recording is quiet or distorted
- Apply light color correction, but avoid heavy filters that alter the original look
Keep an unedited master file separate from any trimmed or enhanced version. Save that master to both an external hard drive and a cloud backup. Hardware fails, and drives get lost or corrupted.
Once your family movies are digitized, plenty of people want physical copies to hand out at reunions or holidays, or to archive large collections properly.
A duplication partner like DiscBurn can load those files onto custom-printed USB drives in bulk, which beats burning dozens of individual discs on your laptop one at a time. Custom USB drives run a 100-unit minimum, with turnaround as fast as 24 hours.
When Should You DIY vs Hire a Professional Digitizing Service?
The right call depends on four things: how many tapes you have, their condition, what equipment you own, and your comfort with capture software.
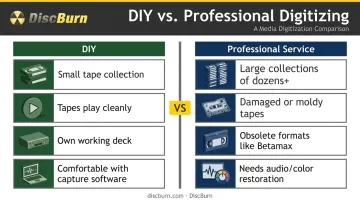
DIY tends to work well when:
- You have a handful of tapes, not hundreds
- Tapes play cleanly with no mold, snapping, or grinding noises
- You already own (or can borrow) a working deck for the exact format
- You're comfortable troubleshooting basic capture software
Professional services make more sense when:
- You're facing a large collection of dozens of tapes or more
- Some tapes are damaged, moldy, or show signs of binder breakdown
- Formats are obsolete, like Betamax, or require frame-by-frame film scanning
- You want audio or color restoration beyond basic cleanup
There's a real risk trade-off here. Cheap consumer capture devices paired with a worn-out deck can do more damage to a forty-year-old tape than leaving it alone, according to AARP's guide to converting home movies. Worn playback heads introduce noise and tracking errors that no software can fix afterward.
This is also where volume matters. Organizations managing large archives, such as schools, churches, hospitals, and dance studios preparing recital videos, need a partner who can scale. DiscBurn regularly works with clients like this, from a school with a handful of tapes to a hospital needing thousands of tapes digitized, delivering finished digital files whether the order is 50 tapes or 5,000.
What You Need Before You Start Digitizing
Before you touch a single tape, make sure you have these three things covered:
- Equipment: A player matching the original format, a capture card or converter box, and a computer with plenty of storage — raw video files grow fast
- Material condition: Tapes free of mold, snapping, or heavy wear, with tension restored via a fast-forward-then-rewind cycle before playback
- Skill readiness: Basic comfort with capture and editing software, plus the judgment to stop if a tape resists playback or a deck sounds off
If any of these are missing, that's a sign to slow down or bring in help rather than risk a one-of-a-kind recording.
Key Factors That Affect Digitization Quality
Not every quality issue traces back to the digitizing method. Often it's the source material or the gear doing the capturing.
Original Tape/Film Condition
Magnetic particles weaken and film stock grows brittle over time. No capture setup, however good, can restore detail that's already been lost. If the source is degraded, the digital copy inherits that degradation.
Playback Equipment Quality
A worn deck introduces noise and tracking lines, sometimes dropping frames entirely — even if it's the exact same model as a well-maintained one. Belts stretch, heads accumulate grime, and motors slow down with age, all of which show up in the final file.
Capture Resolution and Aspect Ratio Settings
Incorrect settings can stretch or crop footage, sometimes adding letterboxing that doesn't match the original recording. Matching the source specs, including that 4:3 ratio mentioned earlier, keeps the footage authentic instead of visually distorted.
Post-Processing and Enhancement Choices
Aggressive sharpening or AI-based "enhancement" tools can introduce artifacts that were never part of the original footage. Light, careful editing preserves what's actually there. Heavy digital enhancement often just adds a different kind of distortion on top of the original.
Common Mistakes to Avoid When Digitizing Home Movies
Most digitizing disasters come down to a handful of avoidable errors:
- Playing untested tapes on old decks without checking playback heads first, risking permanent damage to irreplaceable footage
- Keeping only one digital copy with no cloud or physical backup, leaving decades of memories vulnerable to a single hard drive failure
- Ignoring aspect ratio mismatches, resulting in stretched or awkwardly letterboxed footage that looks nothing like the original
- Choosing the cheapest option available without confirming it's a genuine scan rather than a lower-quality re-recording, or whether retouching is included
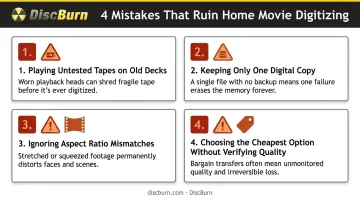
Skipping any one of these might not ruin your project. Combining two or three of them usually does.
Frequently Asked Questions
How much does it cost to digitize old videos?
Pricing depends on tape format, run length, and how many tapes you're converting. Bulk orders typically bring the per-unit cost down compared to converting a single tape.
How much would it cost to digitize 1,000 photos?
Photo digitizing is usually priced per scan, and providers commonly offer volume discounts. Expect the per-photo rate to drop as quantity increases.
Is it worth digitizing old home videos on VHS?
Yes. VHS tape degrades continuously whether it's played or not, so waiting doesn't help. Digitizing now protects the footage and makes it far easier to back up and share with family.
How long does it take to digitize a box of home movies?
DIY capture generally runs in real time per tape, plus editing afterward. Professional services often turn around a batch within a few days to a couple of weeks, depending on volume.
What digital format should I save my home movies in?
MP4 works well for everyday viewing across devices. Keep a separate, higher-quality master file for archival purposes rather than relying on one compressed copy.
Can damaged or moldy VHS tapes still be digitized?
Many damaged tapes can be stabilized and cleaned before capture. Severely degraded or moldy tapes have more limited recoverability, and playing them without treatment first risks losing the footage entirely.