That gap between "looks empty" and "actually gone" is where identity theft, corporate data leaks, and compliance violations happen. The UK Information Commissioner's Office confirms that reformatting alone leaves data recoverable with freely available software. Selling, donating, or scrapping a drive without properly wiping it is a real risk, not a theoretical one.
This guide covers the exact steps to securely erase a hard drive, when DIY wiping is the right call, what you need before you start, mistakes that ruin a wipe, and safer alternatives for organizations handling larger volumes.
Key Takeaways
- Deleting or formatting doesn't erase data — only overwriting or destruction does
- HDDs and SSDs need different wiping methods because of how they store data
- Multi-pass overwriting suits HDDs; SSDs require manufacturer secure erase tools
- Back up everything first; once a wipe starts, recovery isn't possible
- Multiple drives or compliance rules often call for professional sanitization over DIY tools
How to Securely Erase a Hard Drive: Step-by-Step
Whether you're prepping a laptop for resale or decommissioning an office full of desktops, the process follows the same core sequence. Skip a step and you risk either losing files or leaving data behind.
Step 1: Back Up Anything You Want to Keep
Once erasure starts, there's no undo button. Copy everything you might need to an external drive, cloud storage, or physical media before you touch the wipe tool.
A few practical notes:
- Double-check backups actually completed: a failed sync looks identical to a successful one until you need the files
- Keep laptops plugged into power for the entire wipe; a mid-process shutdown can corrupt the drive
- If you're archiving business records rather than personal files, consider a durable format built for long-term storage rather than a single external drive that could fail
Step 2: Identify Your Drive Type (HDD vs. SSD)
This determines which tool you'll use, and getting it wrong wastes time at best and damages the drive at worst.
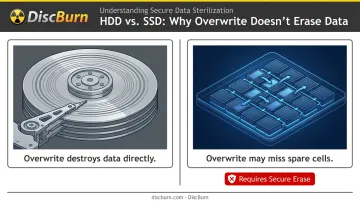
Mechanical hard drives (HDDs) store data on physical platters. Overwriting every sector with new data genuinely destroys what was there before.
SSDs work differently. They use wear-leveling to spread data across memory cells, rotating which physical cells get used. A standard overwrite pass can miss data sitting in spare or remapped cells as a result.
NIST's SP 800-88 guidelines note that overwriting can also reduce flash memory lifespan without guaranteeing full data removal. That's why SSDs need a dedicated Secure Erase or Sanitize command from the manufacturer or firmware, not a repeated overwrite pass.
Step 3: Choose and Run the Right Erasure Tool
Here's where HDDs and SSDs split into separate paths.
For HDDs, a bootable tool like DBAN remains a solid free option:
- Create bootable media (USB or CD) with the DBAN image
- Boot the target machine from that media
- Select the correct drive — this is the step most people rush and regret
- Choose an overwrite method (a 3-pass approach is common for personal use)
- Start the wipe and let it run; larger drives can take several hours
For SSDs, skip HDD-style overwriting entirely and use one of these instead:
- Manufacturer software, such as Samsung Magician or Crucial Storage Executive, which includes a built-in Secure Erase or Sanitize function
- BIOS-level ATA Secure Erase, available on many systems
- Windows Diskpart's
clean allcommand, a free option that zeroes every sector (note: this is different from a plainclean, which only clears partition data)
One catch applies to both drive types: you can't wipe the drive your operating system is running on. Boot drives require running the erasure tool from external bootable media since the OS can't erase itself while active.
Step 4: Verify Completion and Prepare for Reinstallation or Disposal
Don't assume the wipe worked just because the tool said "success." Confirm it:
- Try recovering files with consumer recovery software; if nothing comes back, the wipe held
- Check that the drive reinitializes cleanly when reconnected
- Confirm the drive shows as blank or unallocated in Disk Management (Windows) or Disk Utility (Mac)
If you're keeping or reselling the machine, reinstall the operating system only after you've confirmed the wipe is complete. If you're disposing of the drive, move straight to a disposal or destruction plan.
When Should You Wipe a Drive Yourself?
DIY wiping makes sense in a narrow set of situations. It works well when you're an individual selling, donating, or recycling a single PC or drive, and you're comfortable following the steps above carefully.
It stops making sense once volume or sensitivity increases:
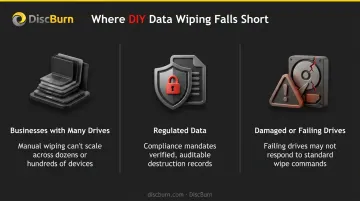
- Businesses with many drives: manually wiping 40 laptops one at a time isn't a good use of anyone's afternoon
- Regulated data: healthcare, finance, and education records often require documented proof of sanitization, not just a completed progress bar
- Damaged or failing drives: a drive that's already throwing errors may not respond reliably to software-based wiping, making physical destruction the safer bet
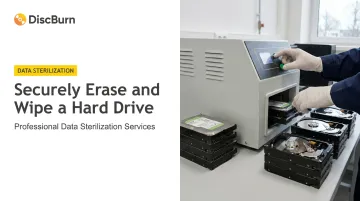
If any of these apply, DIY tools become a liability rather than a time-saver. A professional service, like DiscBurn's data sterilization program, delivers certified proof of destruction and handles volume safely.
What You Need Before Wiping a Hard Drive
Most failed wipes and lost-file complaints trace back to one thing: skipping preparation. Before you start, confirm you have:
- A complete backup of anything you might need later, verified as actually working
- A stable power source: plug in laptops, avoid wiping during a storm if you're on unreliable power
- Correct BIOS drive settings — some SSDs need AHCI mode enabled for Secure Erase commands to work properly
- Bootable USB media ready in advance if you're wiping a boot drive
Organizations decommissioning multiple machines have an extra wrinkle: archiving records before the wipe starts. Schools, churches, healthcare offices, and small businesses often need to preserve certain files for recordkeeping even as they retire the hardware they were stored on.
Bulk backup to durable physical media solves this cleanly. DiscBurn produces custom-loaded USB flash drives (starting at 100 units) and duplicated CD/DVD sets for exactly this kind of archiving, with MD5-verified data integrity built into the duplication process. For an office retiring a dozen workstations at once, that's a more reliable recordkeeping trail than a folder full of individually copied files.
Common Mistakes and Troubleshooting Tips
Even careful users trip on the same handful of issues. Watch for these:
- Skipping the backup step. Once the wipe starts, forgotten files are gone permanently.
- Using HDD-style multi-pass overwriting on an SSD. It burns through write cycles and still might not fully erase data hidden in spare cells.
- Wiping the wrong drive. If multiple disks are connected, double-check drive numbers and labels before confirming, especially when several external drives are plugged in.
- Interrupting the process. Power loss or a sleep-mode interruption mid-wipe can corrupt the drive or leave it partially erased.
If a wipe fails partway through, check power stability and drive connections first, then confirm the drive's firmware is up to date before trying again.
If DIY wiping still feels risky for sensitive data, DiscBurn's data sterilization service offers a verified, professional-grade alternative.
Alternatives to DIY Data Wiping
Software wiping isn't always the right fit, particularly for organizations juggling compliance requirements or a large stack of drives. A few alternatives worth knowing:
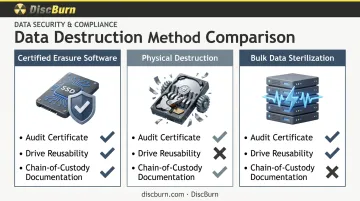
- Professional data erasure software. Tools like Blancco follow NIST SP 800-88 standards and generate an audit-ready certificate for every erasure. This gives regulators proof, not just a verbal assurance that "it's been taken care of."
- Physical destruction. Shredding or degaussing offers the most certainty for highly sensitive or already-failing drives. The tradeoff: the drive can't be resold or reused afterward.
- Bulk data sterilization for decommissioning. DiscBurn's Data Sterilization service handles destruction for organizations retiring many drives at once, backed by chain-of-custody documentation and confirmation-of-destruction paperwork. Archiving records to USB or disc beforehand keeps nothing important from getting lost in the process.
Compliance is often the deciding factor among these options. Under the FTC's Disposal Rule, businesses handling consumer report information must take reasonable steps to ensure data can't be practicably read or reconstructed after disposal. That includes due diligence when hiring an outside disposal contractor, a strong argument for documentation over a quick DIY wipe when compliance is on the line.
Frequently Asked Questions
What is hard drive sanitation?
Sanitation means permanently and verifiably removing data from a storage device so it can't be recovered by any known method. It's a higher bar than simple deletion or formatting.
Is formatting a hard drive the same as securely erasing it?
No. Formatting only clears the file system's index, not the underlying data. The actual files remain recoverable until something overwrites them.
How many passes are needed to securely erase a hard drive?
A 3-pass overwrite is typically sufficient for personal use cases on mechanical drives. Higher-security needs may call for certified erasure software with documented verification instead.
Can data be recovered after a secure erase?
Properly executed secure erase makes recovery virtually impossible with consumer or most professional tools. Physical destruction remains the most certain method for highly sensitive data.
Should I use a different method for SSDs vs HDDs?
Yes. SSDs need manufacturer or firmware-level Secure Erase commands rather than multi-pass overwriting, which can shorten the drive's lifespan without fully clearing the data.
What's the safest way to dispose of a hard drive after wiping it?
Recycle through a certified e-waste program, or opt for physical destruction if the drive held highly sensitive information. Professional sterilization services, like the ones DiscBurn offers, combine both steps with documented verification so no data resurfaces later.